This mini-dino is inspired by the very-popular Timothy the T-Rex pattern by BluePhone Studios. You can purchase the Timothy pattern in BluePhone Studio’s Etsy shop. It’s a wonderful pattern, and I highly recommend it as I obviously crochet a TON of Timothy’s. I do not make money off of promoting this pattern, and as it is not my intellectual property, I will not be making a tutorial for Timothy. I just want to make sure I differentiate this Mini-Dino I designed from Timothy.
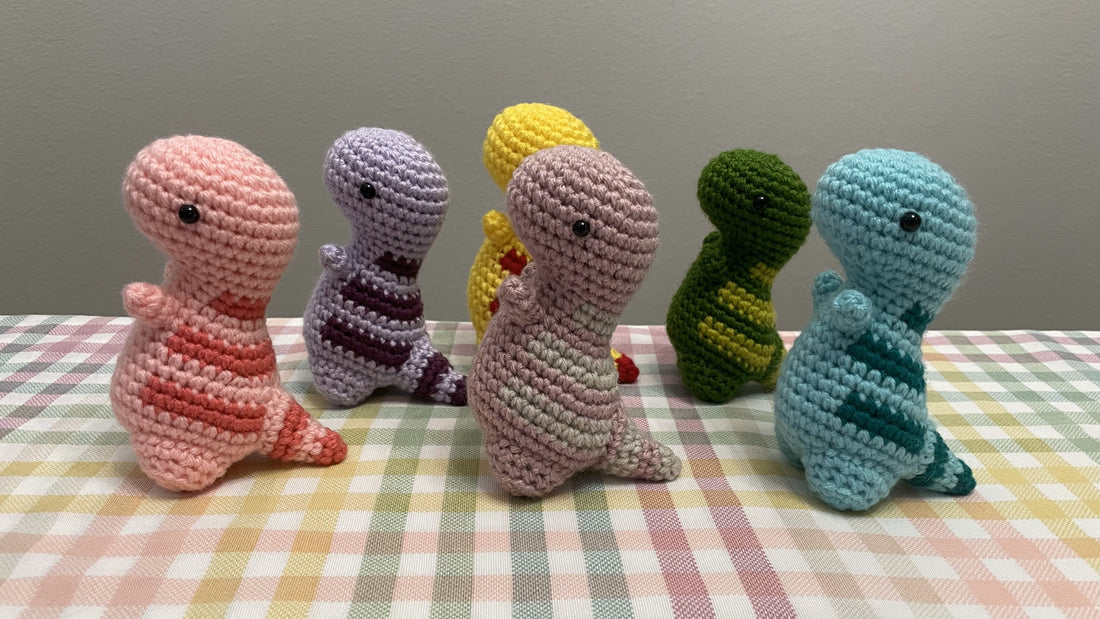
Mini-Dino is designed to have fewer stitches than Timothy, therefore taking less time to make. If you’re also an avid crocheter who likes to sell at live markets or on your own online shop, this pattern is for you because of how fast it works up! Please make and sell ALL the Mini-Dinos! All I ask is that you please credit me with the design so that other crocheters can find this pattern. AND THEN WE CAN FILL THE WORLD WITH DINOSAURS!!!
I also wanted to make this pattern free and as accessible as possible, so here is the video tutorial!
Mini-Dino is made by crocheting each part individually and then sewing them together. Color changes will be indicated with color-coded text.
Materials:
- About 20g of size 4 worsted weight yarn for the main color
- About 5g of size 4 worsted weight yarn for the stripe color
- 4mm crochet hook
- Yarn needle
- Scissors
- 6mm safety eyes
- Stuffing
You can pick up all of these items at your local craft store, or you can check out my Amazon Storefront to see the items that I regularly buy–if you make a purchase, I do earn a commission.
Abbreviations:
MR = Magic Ring
MC = Main Color
CC = Contrasting Color
sc = Single Crochet
inc = Increase
dec = Decrease
st = Stitch
sl st = Slip Stitch
BLO = Back Loops Only
Body:
R1: 6sc in MR (6)
R2: 6inc (12)
R3: (1sc, inc)x6 (18)
R4: (2sc, inc)x6 (24)
R5: (3sc, inc)x6 (30)
R6-9: 1sc in each st (30)
R10: 11sc, 4dec, 11sc (26)
R11: 7sc, 6dec, 7sc (20)
R12: 5sc, 5dec, 5sc (15)
R13: MC-11sc, CC-4sc (15)
R14: CC-4sc, MC-7sc, CC-4sc (15)
R15: CC-4sc, MC-1sc, inc, 3sc, inc, 2sc, inc, 2sc (18)
R16: 2sc, inc, 4sc, inc, 1sc, inc, 6sc, inc, 1sc (22)
R17: 1sc, inc, 14sc, CC-5sc, inc (24)
R18: CC-1sc, inc, 5sc, MC-10sc, CC-4sc, inc, 2sc (26)
R19: CC-1sc, inc, 6sc, MC-15sc, inc, 2sc (28)
Pause to place 6mm eyes between R7-8 about 16 st apart. Stuff head.
R20: 2sc, inc, 24sc, inc (30)
R21: 21sc, CC-9sc (30)
R22: CC-1sc, inc, 7sc, MC-12sc, CC-6sc, inc, 2sc (32)
R23: CC-10sc, MC-2sc, inc, 6sc, inc, 12sc (34)
R24: 2sc, inc, 28sc, inc, 2sc (36)
R25: (4sc, dec)x6 (30)
R26: (3sc, dec)x6 (24)
R27: (2sc, dec)x6 (18)
Pause to stuff body.
R28: (1sc, dec)x6 (12)
R29: 6dec (6)
Fasten off, tucking in the yarn end.
Arms (make 2):
R1: 5sc in MR (5)
R2-3: 1sc in each st (5)
Sl st in next st. Fasten off, leaving a tail for sewing.
Feet (make 2):
R1: 6sc in MR (6)
R2: 6inc (12)
R3: In BLO, 1sc in each st (12)
R4: (1sc, inc)x6 (18)
Sl st in next st. Fasten off, leaving a tail for sewing.
Tail:
R1: CC-4sc in MR (4)
R2: (1sc, inc)x2 (6)
R3: MC-1sc in each st (6)
R4: (1sc, inc)x3 (9)
R5: CC-1sc in each st (9)
R6: 3sc, 3inc, 3sc (12)
R7: MC-4sc, inc, 2sc, inc, 4sc (14)
Sl st in next st. Fasten off, leaving a tail for sewing.
Finishing:
Sew arms to body.
Sew the tail to body.
Sew the feet to body.
I'd love to see pictures of your completed Mini-Dino! Tag @mary.merrymakes and use the #merrymakes to share off your creation with me! Please feel free to gift and sell your creations-all I ask is that you credit me @mary.merrymakes with the design. If you enjoyed this pattern and video tutorial, please consider supporting my work by buying me a coffee!