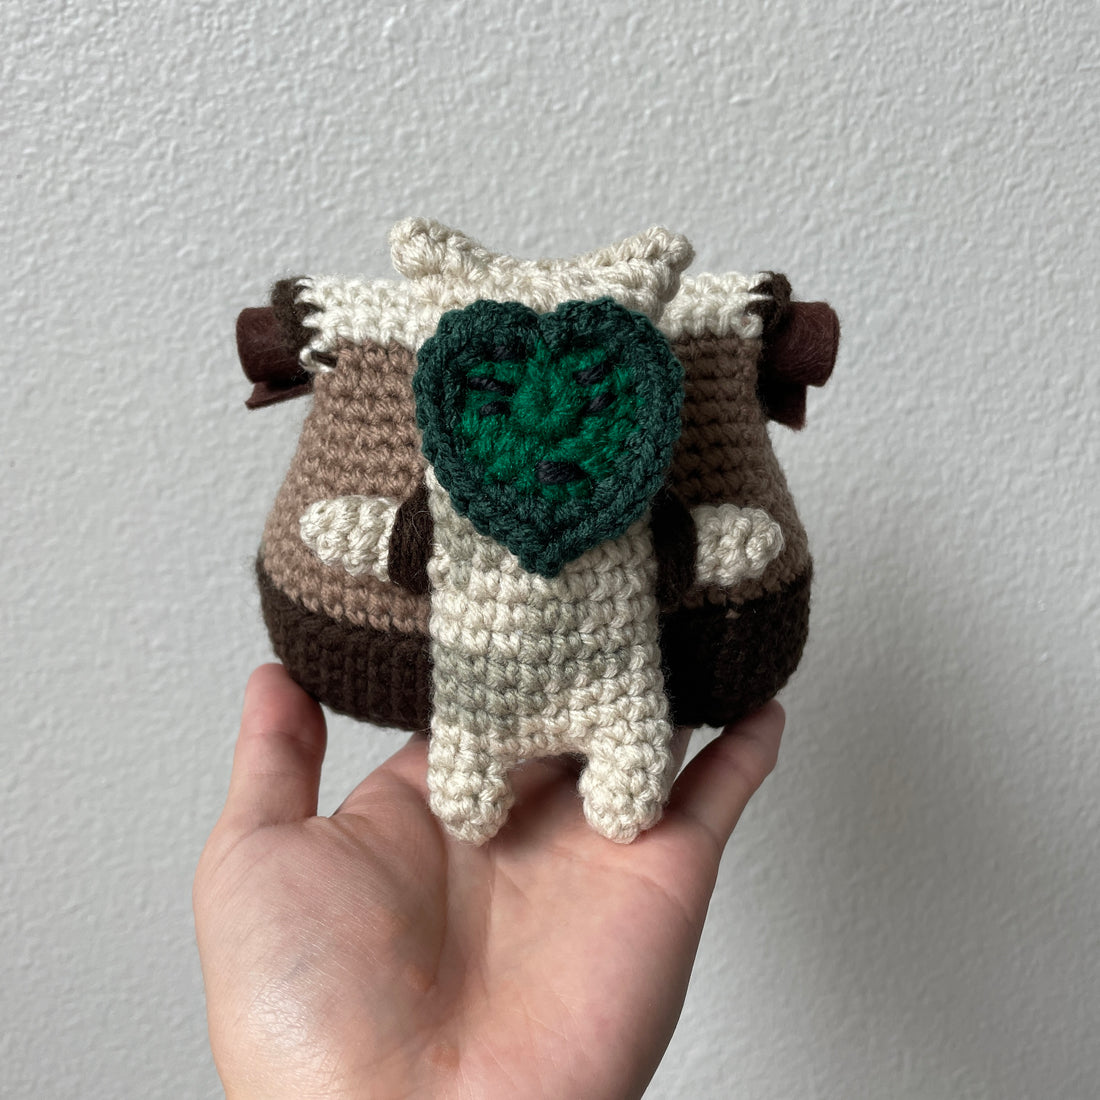
If you’ve been playing Legend of Zelda Tears of the Kingdom, then you’ve probably encountered some of these backpack Koroks. These little Koroks carry backpacks that are much bigger than their bodies and as a result, they’re slowed down by the weight and get separated from their travel companion, and it’s Link’s job to reunite them because he wants more Korok Seeds to expand his inventory!
I designed this pattern to be as simple as possible. There is minimal sewing-just yarn ends to weave in and details to embroider on. I did write this pattern with color changes to make a bit of a wood pattern on the Korok’s body, but since the mask covers up half the body and it’s wearing a backpack, the detailed color changes are partially covered up, so making the wood pattern is completely optional. Alternatively, you could buy your favorite variegated yarn and let the yarn do the color changing for you!
Personally, I feel very strongly about sharing the joy that I get from crocheting with you–which is why I make all my patterns free and into video tutorials. This is the free version of my Backpack Korok pattern and the video tutorial will show you step-by-step how to crochet it! In addition to this free version, I am selling a paid version of the pattern. It is an 11 page PDF that has step-by-step pictures along with the patterns for the 8 other Korok masks. I’d really appreciate it if you supported my work by purchasing the PDF of the pattern.
Materials
-
Various colors of size 4 worsted weight yarn (you’ll need to select 1-2 colors for the Korok body, 1-2 colors for the mask, and 1-3 colors for the backpack)
- Color A - Cream
- Color B - Tan (Optional)
- Color C - Green
- Color D - Dark Green
- Color E - Chocolate Brown
- Color F - Mustard
- Color G - Light Brown
- Black yarn or embroidery thread for the face
- 4mm crochet hook
- 5 x 5 inch square piece of felt
- Yarn needle
- Stitch marker
- Scissors
- Stuffing
- Optional: Floral accents/charms for the various backpack accessories such as the acorn, camping mug, and berries
Abbreviations
MR = Magic Ring
ch = Chain
sc = Single Crochet
hdc = Half Double Crochet
inc = Increase (2 sc in 1 st)
hdcinc = 2 hdc in 1 st
dec = (Invisible) Decrease
dec3tog = Decrease 3 stitches together
st = Stitch
sl st = Slip Stitch
BLO = Back Loops Only
Korok Foot (Make 1)
In Color A,
R1: 6sc in MR (6)
R2-3: 1sc in each st (6)
Sl st to fasten off. No need to leave a long tail.
Other Korok Foot and Body
In Color A,
R1: 6sc in MR (6)
R2-3: 1sc in each st. (6)
Sl st in next st, ch 4, sl st to other foot.
R4: 5sc around foot, 4sc across ch, 5sc around other foot, 4sc across ch (18)
R5: 1sc in each st (18)
Note: At this point, you may choose to ignore the detailed color changes if you’d like your Korok’s body to be worked entirely in Color A.
R6-18: 1 sc in each st (18)
Proceed directly to R19.
Otherwise, continue below for the pattern to work the body using both Color A and Color B.
Body with Color A & B
R6: A-8sc, B-7sc, A-3sc (18)
R7: A-7sc, B-10sc, A-1sc (18)
R8: A-4sc, B-14sc (18)
R9: B-2sc, A-4sc, B-2sc, A-8sc, B-2sc (18)
R10: B-2sc, A-4sc, B-2sc, A-8sc, B-2sc (18)
R11: B-1sc, A-9sc, B-3sc, A-5sc (18)
R12: A-9sc, B-6sc, A-3sc (18)
R13: A-3sc, B-2sc, A-3sc, B-8sc, A-2sc (18)
R14: A-2sc, B-4sc, A-2sc, B-3sc, A-2sc, B-3sc, A-2sc (18)
R15: A-1sc, B-9sc, A-4sc, B-3sc, A-1sc (18)
R16: A-1sc, B-8sc, A-6sc, B-3sc (18)
R17: B-4sc, A-2sc, B-2sc, A-8sc, B-2sc (18)
R18: B-3sc, A-15sc (18)
Fasten off Color B.
R19: 4sc, 2inc, 7sc, 2inc, 3sc (22)
R20: 2dec, 4inc, dec, dec3tog, dec, 4inc, dec, 1sc (23)
Make 6 additional sc. Stuff, and fasten off, using the tail to whipstitch the body closed. Tuck tail in.
Arms (Make 2)
R1: 4sc in MR (4)
R2: (1sc, inc)x2 (6)
R3-5: 1sc in each st (6)
Fasten off, leaving a tail for sewing. Attach arms to body between R11-13.
Heart Shaped Mask
Note: The patterns for the 8 other Korok masks are available in the paid version of this pattern.
In Color C,
R1: 8sc in MR (8)
R2: 3hdcinc, 4hdc in next st, 3hdcinc, sl st in last st. (17) Change to Color D.
R3: 3inc, 3sc, 2inc, ch2, 2inc, 3sc, 3inc, sl st in last st. (27)
Fasten off, leaving a tail for sewing.
Use black yarn or embroidery thread to add the face. Attach mask to body.
Backpack
Note: Unlike the Korok body and mask, which are crocheted in continuous (spiraling) rounds, the backpack is crocheted in joined rounds for a clean color change. At the end of each round, we will sl st into the first st of the round and ch 1 at the start of the next round. The first stitch of each round is worked into the same stitch where you made the sl st.
In Color E,
Ch 17.
R1: Starting in the 2nd ch, 15sc, 3sc in next st. On the other side of the ch, 15sc, 3sc in next st (which is the chain that we skipped at the beginning). Sl st to the next st to join the round. (36)
R2: Ch 1. 15sc, 3inc, 15sc, 3inc. Sl st to join the round. (42)
R3: Ch 1. 15sc, (1sc, inc)x3, 15sc, (1sc, inc)x3. Sl st to join the round. (48)
R4: Ch 1. 15sc, (2sc, inc)x3, 15sc, (2sc, inc)x3. Sl st to join the round. (54)
R5-9: Ch 1. 1sc in each st. Sl st to join the round. (54) Change to Color F.
R10: Ch 1. In BLO, 1sc in each st. Sl st to join the round. (54)
R11: Ch 1. 1sc in each st. Sl st to join the round. (54)
R12: Ch1. 15sc, (2sc, dec)x3, 15sc, (2sc, dec)x3. Sl st to join the round. (48)
R13-14: Ch 1. 1sc in each st. Sl st to join the round. (48)
R15: Ch1. 15sc, (1sc, dec)x3, 15sc, (1sc, dec)x3. Sl st to join the round. (42)
R16-17: Ch 1. 1sc in each st. Sl st to join the round. (42)
R18: Ch1. 15sc, 3dec, 15sc, 3dec. Sl st to join the round. (36)
R19-20: Ch 1. 1sc in each st. Sl st to join the round. (36) Stuff the backpack.
R21: Ch 1. Flatten the backpack. Working though the front and back stitches, 18sc across to close the backpack. (18) Change to Color G.
R22-31: Ch 1, 18sc, turn. (18)
Fasten off Color G.
Backpack Flap Edge
With Color E, join with a standing sc (With a slip knot on your hook, insert your hook, draw up a loop and complete the sc.) on the edge and sc around the flap, making 3sc in each corner. Fasten off, weaving in all tails.
Finishing the Backpack
With the rolled up 5 x 5 piece of felt tucked under the backpack flap, use a length of Color E to embroider a strap holding the flap to the bag. Embroider a chain stitch to look like a bag clasp.
Sew Backpack Straps
With the Korok placed on the backpack, use a length of Color D to sew shoulder straps around the Korok's arms. At this point, the Korok can be removed from the backpack, or you may also choose to permanently attach the Korok to the Backpack.
I'd love to see pictures of your completed Backpack Korok! Tag @mary.merrymakes and use the #merrymakes to share off your creation with me! Please feel free to keep, gift, and sell your creations-all I ask is that you credit me @mary.merrymakes with the design. If you enjoyed this pattern and video tutorial, please consider supporting my work by buying me a coffee!